Instructions to do so:
Telnet (port 23) into your Ricoh device
msh> smb client auth (to display the current SMB setting; if value is "0" this means it is using SMB1.0 client & NTLM/LM authentication; if value is "1" this means it is using SMB2.0 client & NTLMv2/NTLM/LM authentication)
msh> smb client auth 1 (to change the current SMB setting to smb2.0)
msh> smb client port (to show current SMB port, default is 139 on older devices and 445 on newer devices)
msh> smb client port 445 (to change SMB port to port 445)
msh> logout (to logout and save configuration)
=============================================
Use the "smb" command to configure or delete a computer or workgroup name for SMB.
View settings
msh> smb
Computer name settings
msh> smb comp "computer name"
Set a computer name using up to 15 characters.
Names beginning with "RNP" or "rnp" cannot be entered.
Working group name settings
msh> smb group "work group name"
Set a workgroup name using up to 15 characters.
Comment settings
msh> smb comment "comment"
Set a comment using up to 31 characters.
Notify print job completion
msh> smb notif {on|off}
To notify print job completion, specify "on". Otherwise, specify "off".
Deleting computer name
msh> smb clear comp
Deleting group name
msh> smb clear group
Deleting comment
msh> smb clear comment
View protocol
msh> smb protocol
Priority port setting for SMB client communication
To view the setting
msh> smb client port
To specify the priority port for SMB client communication
msh> smb client port {139|445}
Authentication level for SMB client
To view the setting
msh> smb client auth
To specify the authentication level for SMB client
msh> smb client auth {0|1}
WSD browsing for SMB client
To view the setting
msh> smb client wsd
To specify WSD browsing for SMB client
msh> smb client wsd {on|off}
=========================================================
SMBV2 is possible on most newer Ricoh machine's. It must be enabled through Telnet.
The info did not "Paste" as nicely as I had hoped. Follow the "text" directions and you should be fine. Some machines my need a firmware upgrade for some of this to work.
msh> smb client auth
-Displays the current setting
msh> smb client auth 1
-Enables NTLMv2
msh> logout
-Saves data
Setting value
Result
0 (default)
SMB client uses NTLM/LM authentication.
1
SMB client uses NTLMv2/NTLM/LM authentication.
Authentication level setting: The device will use only one protocol with the priority that is the highest among the available protocols. The priorities are listed in the table below. The device cannot switch between them automatically.
Priority
Authentication
Level 0 (default)
Level 1
High
|
Low
NTLMv1
NTLMv2
LAN Manager
NTLMv1
Plain Text
LAN Manager
N/A
Plain Text
The SMB port can be changed via Telnet:
msh> smb client port
-Displays the current setting
msh> smb client port #
-Change port number
Setting value
Result
139 (default)
SMB client uses port 139 port
445
SMB client uses port 445 port
================================================================
最終測試後的有效辦法: (以上都沒有效)
重點就是,請更新firmware,才是有效辦法。
這邊就要稍微抱怨一下Ricoh官網,資訊寫的都不清不楚。
以RICOH MP C3503為例,為了support SMBv2,我參照以下連結:
https://www.ricoh.com/products/mfp20170727_1#smb
但從官網來自2017年的資訊,只知道要更新,但看不到我該更新到什麼版本,才有支援SMBv2。 我是從2022年第二季,才開始使用RICOH C3503,理應廠商提供的機器,應該不會太舊,或是已更新過了。
但自從為了安全性NAS改用SMBv2,印表機SCAN到NAS,就會失敗。降回SMBv1就正常。
就覺得印表機,不支援SMBv2真的不行。
而印表機廠商又不是很懂這塊,經過和租賃印表機廠商的工程師討論後,我決定更新韌體了,看是否可以改善。
Step1: 於是到官網,從型號找Firmware,找到以下連結。
http://support.ricoh.com/bb/html/dr_ut_e/re2/model/mpc3003/mpc3003.htm?lang=en
找到: RICOH Firmware Update Tool ver 1.05 Released Date: 29/10/2022
查看History內文,Release notes: Version 1.05
有說明更新使用 System/Copy:3.33 (但最終更新1.06,System/Copy : v1.41,請看下文)
Step2: 點進Download,又轉往連結
https://support.ricoh.com/bb/html/dr_ut_e/rc3/model/r_firm/r_firm.htm
Step3:
找到: RICOH Firmware Update Tool ver 1.06 Released Date: 06/15/2022
實在很奇妙,版本較新,但Released Date較舊,到底誰比較新?
而從Release notes,也看不到跟SMB有關的描述。
過程中,一切都是試試看,才能知道結果。
請下載 RICOH Firmware Update Tool ver 1.06。
Step4: 執行RICOH Firmware Update Tool ver 1.06,接下請按照顯示畫面資訊介面,進行更新firmware update。
Step5: 等待更新進度直到100%,顯示Complete。
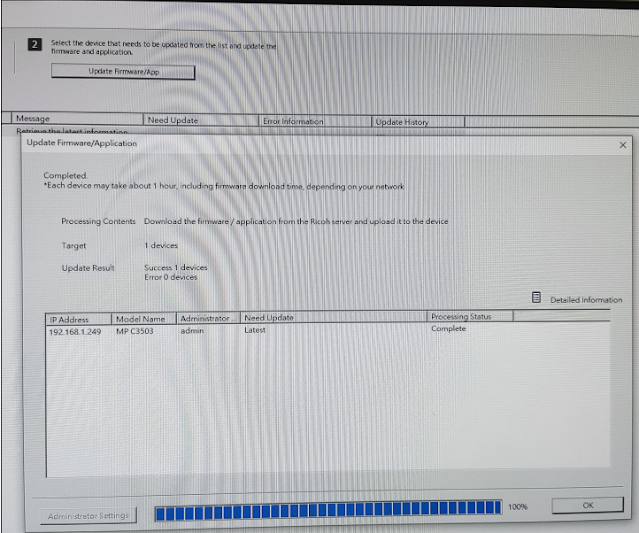
結果:
最終更新後,測試在SMBv2的環境下,使用已更新後的Ricoh C3503 SCAN to NAS。
可以成功的掃描到NAS去。
以下貼圖供參考(請特別注意System/Copy 的版本資訊變化)
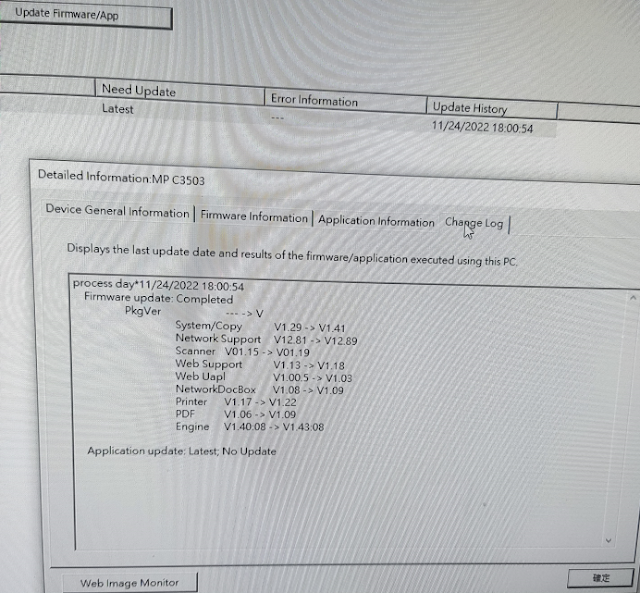
ricoh_fw_change_log
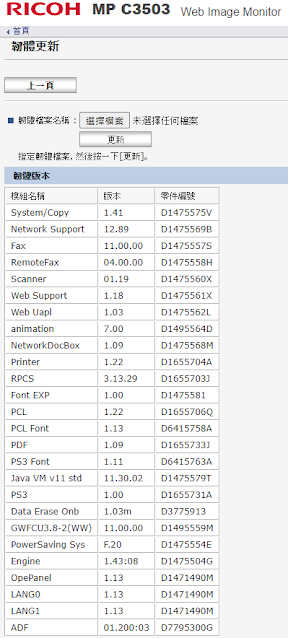
ricoh firmware更新後韌體版本
CLI Mode 更新後,都不改的設定值:
RICOH Maintenance Shell.
User access verification.
login:admin
Password:
User access verification ... OK.
RICOH MP C3503
Network Control Service Ver. 12.89
Copyright (C) 1994-2021 Ricoh Co.,Ltd. All rights reserved.
msh> smb client auth
Client Auth Level : 0
msh> smb client port
Client Port : 445
msh>
================================================================
參考連結:
https://www.youtube.com/watch?v=unlkagT8GpM&ab_channel=PrestigeOfficeSolutions
http://support.ricoh.com/bb_v1oi/pub_e/oi_view/0001044/0001044959/view/netsys/int/0093.htm
https://www.ricoh.com/products/mfp20170727_1#smb
https://community.spiceworks.com/topic/1995109-damit-ricoh-smbv1-really
https://mtechsinfo.com/files/Ricoh%20SMB%20V2%20and%20V3%20SUPPORT.pdf


